We require Print-Ready files with proper rotation. Files submitted are printed HEAD to HEAD as-is based off your files.

Make sure to set up your files so that when we print them HEAD to HEAD the final product will read the way you would like. Also, front and back files need to be set up either both sides vertically or both sides horizontally.

If you would like your back file to be upside down, please send your artwork as shown below.

If you have a fold-over or greeting card, please send your artwork as shown.

For files not properly set up, we will use best judgment, but will not be responsible for improper rotation.
Primarily used to intentionally overlap inks for a number of reasons, overprint can cause unexpected results. We suggest that you turn all overprint objects off before submitting your files.
When sending artwork, do not send extra files, like proofs or samples, because they might accidentally get printed. Only send the files you need printed.
We are not responsible for these kinds of files being printed. Unless specifically requested by us, DO NOT send files that you do not want printed.
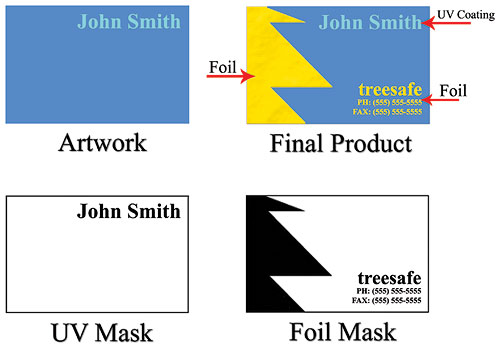
When creating an Advanced Gloss job, you must include an Advanced Gloss template file along with the regular print file. The Advanced Gloss template file is used to show where the UV coating needs to be applied.

For better quality, we recommend creating mask files in vector based programs such as Illustrator or CorelDRAW.
Please only use solid 100% K to indicate where you would like the UV. Do not use shadows, glows or grayscale images. White will indicate no UV.
When using a blue in your design, always make sure to leave at least a 30% difference in your Cyan and Magenta values.
100% C, 100% M, 0% Y, 0% K
ON SCREEN


AFTER PRINTING

Blue is close to purple in the CMYK spectrum. Remember, use a low amount of magenta whenever using high amounts of cyan to avoid purple.
EXAMPLE: C-100 M-70 Y-0 K-0
No. We are set up to process one side at a time, and this requires that each side of a job must be on a separate file.
Not separating files will cause delays and you might have to send the files again. Remember to separate the pages of your *.pdf files as well.
Grayscale images that are converted to CMYK will have a color shift in the final print. That shift may be green or yellow.
GRAYSCALE ON SCREEN VS. AFTER PRINT:


Always check the CMYK values of your grayscale in the final CMYK document. If there are other values other than K in your grayscale image, there is a chance that the color will vary.
To eliminate all values other than K, use your Channel Mixer (adjustment layer) in Photoshop, then click “Monochrome” and adjust accordingly.
Cracking of the edges of a business card sometimes occurs when the card contains high values of ink, as in dark colors.
CLOSE UP OF BUSINESS CARD


This usually happens on a small amount of cards in the run. To prevent this, use lighter colors or if you must use dark colors, use as little ink as possible.
Rich black is an ink mixture of solid black, 100% K, with additional CMY ink values. This results in a darker tone than black ink alone. If you print black alone as 100% K, the resulting black may not be as dark as you might like.
100% K ON SCREEN


100% K AFTER PRINT

We recommend using
C 60, M 40, Y 40, K 100
This will give you a deep, dark, rich black.
When a job is coated with UV then scored and folded the job may begin to crack. During use, the cracks will become bigger and the ink may start to chip off.
CLOSE UP SCORING


Cracking is normal when coated jobs are scored and folded. Ordering the job without UV will help but may not prevent this. As the job is used and folded more and more, cracking will eventually happen.
Many things can cause banding. Banding can be caused by the program that it is exported from, such as Indesign or Corel. Also, too many gradient steps, for example going from a very light color to a dark color, in a small area will cause banding.
CLOSE UP OF BANDING


To prevent this, check your digital files before sending. If you use a gradient, make sure it has enough room for a smooth transition.
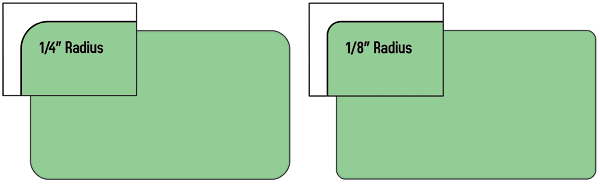
We offer 1/4″ and 1/8″ radius round corners to all of our customers. Please reference the phone below:
We offer 3 types of foil: Silver, Gold and Copper. We can only use one type of foil per order so for example you can not order a Foil job with Gold foil on the front and Silver foil on the back.
Foil job files are set up just like our Advanced Gloss job files. You must provide a separate Foil mask file: black in the areas you want the foil and white in the areas you do not want the foil. All black areas should be solid 100% K with no other added colors. If you order a Foil job with Advanced Gloss, you’ll need to provide separate mask files for the Foil (foil mask) and UV (advanced gloss mask), in which case you may be required to provide up to 6 files.
Please keep in mind, however, that the Foil and UV coating can’t overlap, both should be at least 1/16″ apart to avoid foil peeling off. Also, avoid using small / fine text or lines for foil objects. For best results, please make sure that foil coverage is less than 50% of the entire print side.
Also, be aware that there may be up to a 1/16″ shift on the placement of the foil. Keep this in mind if you are trying to align foil with other printed artwork on the card.
Yes, Bumper Stickers are intended for use on car bumpers and are resistant to even the harshest weather conditions. Outdoor application will not result in product damage.
We do not offer wholesale discounts at this time.
Your files should always be 300dpi or higher.
Keep in mind, your designs should be created in 300 dpi or higher; it will do you no good to convert a lower resolution into 300 dpi.
Always send CMYK files.
If you send us an RGB file, there is a chance that a color shift will occur, and you might not be satisfied with your print job. We cannot be held responsible for color variations if files are sent in RGB. You should always start and finish your designs in CMYK color mode.
We recommend saving as a *.pdf, but you may also send the following extensions: *.jpg, *.jpeg, *.tif, *.tiff, *.eps, and *.png
Important: When sending *.pdf, please embed or outlined fonts. Remember to add crop marks and flatten your files before uploading.
We do not ship to PO Boxes.
We don’t provide a pricing or weight list, but you can get immediate shipping pricing on our website when placing an order.
If the product you are wanting to purchase is not on our website, or if it is a custom quote, please contact us.
We do not currently offer split shipments for the same order. We apologize if this is an inconvenience to you.
Yes. We can drop ship a package to someone else. Before placing an order, please contact us directly by calling 1-888-ZOOGABOOG or contact us through the website.
We currently use UPS to ship 99.9% of our packages. If you need to request a special arrangement, it might be possible we can accomodate you.
Unfortunately, at this time, we do not offer that option.
We are unable to provide special packaging or boxing arrangements at this time. Our standard boxes will be used to ship your orders.
We do not currently provide shrink wrapping as a service.
Some orders can be combined, and others cannot. For example, poster orders are able to be rolled up and placed in the same tube. However, two sets of business cards cannot be combined and placed in the same box.
For specific questions on this topic, please feel free to call us.
Unfortunately, we do not currently ship outside the United States. We do intend to implement this feature in the future and apologize if this is an inconvenience.
We recommend using the latest version of any browser to access our website, but between friends, we prefer Google Chrome.
If you experience any issues at all whatsoever using our website, please contact us.
In addition to ordering through the website, we can also accept orders over the phone. Please call us @ 1-888-ZOOGABOOG (966-4226)
There are multiple ways to get your problem solved quickly. Please contact us.
Please request a custom quote here or call us any time.
Please call us to request artwork templates while we update this portion of our FAQs on the website.
If you need to check in on something, feel free to contact us until we can add this automatic feature to our website.
Please call us as we are still updating this FAQ.
Registration is easy and can be done here. Please note accounts are manually verified before being opened. Please give us a call if you would like to open an account.
Security Tint Envelopes have a blue crisscross pattern on the inside of the envelope which distorts the message on the document enclosed within, which prevents the contents from being read or deciphered. For your convenience, they also come with a self adhesive strip.
What material are Window Clings made of?
Clear Window Clings are made of 8mil thick clear glossy material with a paper backer that will be peeled off prior to application. They are suitable for indoor or outdoor use. Ideal for POP signage on glass or other very smooth, clean surfaces. Excessive heat or cold will not allow the product to cling to the surface.
How do I set up and create a Clear Window Cling with white ink?
With Clear Window Clings, you have the option to use white ink as an overprint so your printed graphic can be opaque in some areas and transparent in others. This will allow for vibrant, crisp color.
Similar to Advanced Gloss masks, White Mask files are separate from your artwork files and black color indicates where the white ink will print.
Make sure to create your mask file the same size as your color art file. This will prevent alignment issues during printing.
Note: White Masks must be made in vector format and be saved as *.EPS or *.PDF and use 100% K.
Use vector paths/shapes to create black color areas that will indicate where the white ink base will go. The rest of the area will represent the Clear Window Cling stock.
Black in the White Mask file indicates where white ink will be printed. Remember the following when creating a white mask for your white ink base:
– White ink base will be printed behind any color that’s in your Artwork Layer.
– Areas with color but without a White Mask will be printed with color directly on the material. These areas will have somewhat transparent color due to the Clear substrate.
– Areas with color and a White Mask will be printed as opaque or solid color.
– Areas with a White Mask and no color will be printed as white.
– The black for the White Mask file must be 0% C 0% M 0% Y 100% K or it will not be recognized by preflight.
If your Clear Window Cling is intended to be viewed from the outside of a window, then the artwork should be reversed prior to submission. See images below.
Are Window Clings reusable?
As long as the cling remains clean it can be reused several times. We recommend that you keep the backing to protect the cling if you plan to reuse it.
How do I install a Window Cling?
Start with by thoroughly cleaning and drying the window or application surface. Use a spray bottle filled with soapy water to spray to completely cover the application area. We recommend 1% soap and 99% water. Carefully peel away the backing and avoid letting the cling fold over on itself. Place the side that had the backing against the surface and apply the cling to the window. Use a squeegee or credit card to squeeze out access water pressing from the center outwards. You can spray more soapy water on the back of the graphic to lubricate the surface as you are eliminating air bubbles.
This service is still being implemented into the website. Please contact us for assistance setting up variable numbering.
- The bleed required is 0.125″ (0.0625″ on each side).
- Text and images should be at least 0.25″ from the edge.
- Artwork with more than 40% ink coverage must be submitted as an offset product.
- Full color backgrounds should be avoided.
- Use a white backgrounds with low ink coverage (e.g. logo and text only).
- Avoid or limit use of transparencies and gradients.
- For window envelopes, the window area must be free of ink.
- For Envelopes:
- 4/0 = Full Color Front
- 4/4 = Full Color Front and Full Color on Back Flaps
- 0/4 = Full Color on Back flaps
Please call us.
Unlike our Low Tac Wall Graphics, Bumper Stickers use a strong, permanent adhesive. We do not recommend removing them once they’ve been applied.